Pots and pans are the unsung heroes of our kitchens, silently cooking up delicious meals day in and day out. But over time, these hardworking kitchen companions can start to lose their luster, with stubborn grease and burnt-on residue dulling their once-shiny surfaces. Instead of tossing them out or reaching for harsh chemical cleaners, there’s a surprisingly simple and budget-friendly solution that can restore your pots to their former glory.
Say goodbye to scrubbing and scraping – the key to reviving your pots lies in a common household staple: baking soda. This versatile ingredient not only cleans effectively but also won’t break the bank. With a little elbow grease and some clever techniques, you can bring those battered pots back to life without breaking the bank.
Understanding the Culprits: Why Pots Lose Their Shine
Everyday cooking can take a toll on even the sturdiest of pots. From searing meat to simmering sauces, the constant exposure to heat, grease, and food residue can gradually dull the sheen of your cookware. Over time, this buildup can become stubbornly stuck, making it difficult to restore the original luster.

While some pots may be designed to withstand these challenges, the reality is that no cookware is truly immune to the ravages of everyday use. The key is to have a reliable, low-cost cleaning method on hand to tackle these issues before they become a major headache.
Fortunately, with a few simple ingredients and a bit of elbow grease, you can bring those battered pots back to life without breaking the bank.
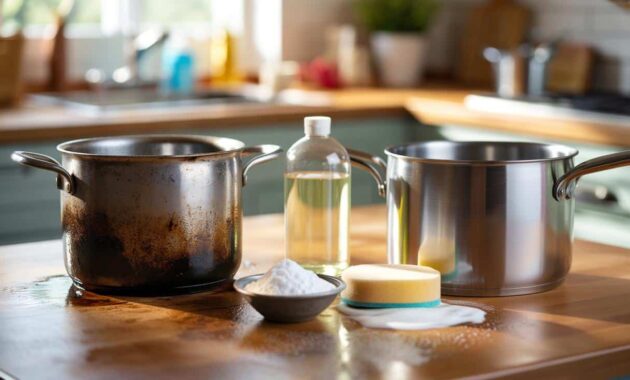
The Budget-Friendly Cleaning Combo: Baking Soda and Vinegar
The secret to reviving your pots lies in the power of two common household items: baking soda and white vinegar. This dynamic duo works together to break down even the most stubborn grime and grease, leaving your cookware sparkling clean.

Start by sprinkling a generous amount of baking soda into the affected pot or pan. Add just enough white vinegar to create a paste-like consistency, and then let the mixture sit for 10-15 minutes. This allows the chemical reaction between the baking soda and vinegar to work its magic, softening and loosening the built-up residue.
Once the time is up, grab a non-abrasive sponge or scrub brush and gently scrub the pot or pan in a circular motion. The baking soda will act as a gentle abrasive, helping to lift away the grime without scratching the surface. Rinse thoroughly with warm water, and you’ll be left with a pot that looks almost brand new.
Tackling Tough Burnt-On Residue
For those stubborn cases where the grease and residue just won’t budge, you can turn to a slightly more intensive method. Start by filling the pot or pan with water and bringing it to a boil. Once the water is simmering, add a generous sprinkling of baking soda and let it sit for 10-15 minutes.

The heat and baking soda will help to break down the tough, burnt-on grime, making it much easier to scrub away. After the soak, use a non-abrasive sponge or scrub brush to gently scrub the surface, taking care to avoid scratching the material.
If you still encounter some particularly stubborn spots, don’t be afraid to give them a little extra attention. Sprinkle on some additional baking soda and let it sit for a few more minutes before scrubbing. With a bit of elbow grease and patience, you’ll be able to restore even the most battered pots to their former shine.
Special Considerations for Non-Stick Pans
When it comes to non-stick cookware, the cleaning process requires a bit more care and attention. While the baking soda and vinegar method can still be effective, you’ll want to avoid using anything too abrasive that could potentially damage the delicate non-stick coating.

Instead of a scrub brush, opt for a soft sponge or cloth when cleaning non-stick pans. Gently rub the baking soda and vinegar mixture onto the surface, taking care not to press too hard. Rinse thoroughly with warm water, and you’ll have a non-stick pan that’s as good as new.
It’s also important to avoid using any metal utensils on non-stick surfaces, as this can scratch the coating and compromise the pan’s non-stick properties. Stick to silicone, wood, or plastic tools to preserve the integrity of your non-stick cookware.
Cleaning the Exterior: The Forgotten Side of the Pot
While the interior of your pots and pans may be the primary focus, don’t forget about the exterior. Over time, the outer surfaces can accumulate a buildup of grease, spatter, and discoloration, which can detract from the overall appearance of your cookware.

Fortunately, the baking soda and vinegar cleaning method works just as well on the exterior as it does on the interior. Simply apply the paste to the outer surfaces, let it sit for a few minutes, and then gently scrub with a non-abrasive sponge or cloth. Rinse thoroughly and dry with a clean towel for a pot that shines from the inside out.
By taking the time to clean both the interior and exterior of your pots and pans, you’ll not only restore their original luster but also maintain their durability and longevity.
The Cost-Saving and Eco-Friendly Benefits
Using a budget-friendly cleaning method like baking soda and vinegar doesn’t just save you money – it also has a positive impact on the environment. By avoiding harsh chemical cleaners, you’re reducing the amount of potentially harmful substances that end up in our waterways and ecosystems.

Furthermore, this method helps to extend the life of your cookware, reducing the need to replace pots and pans as often. When you can revive a battered pot instead of tossing it, you’re not only saving money but also reducing waste and resource consumption.
In a world where every penny counts and environmental consciousness is more important than ever, this simple, low-cost cleaning technique checks all the boxes. It’s a win-win for your wallet and the planet.
Safety Checks Before a “Revival Project”
Before you embark on your pot-cleaning adventure, it’s important to take a few safety precautions. First, always check the manufacturer’s instructions for your specific cookware to ensure that the baking soda and vinegar method is suitable for the materials used.

Additionally, inspect your pots and pans for any cracks, chips, or other signs of damage. If you notice any issues, it’s best to retire the pot and invest in a replacement, as damaged cookware can pose a safety hazard during the cleaning process.
Finally, be mindful of the condition of your non-stick coatings. If the surface is severely scratched or worn, it may be time to replace the pan, as the non-stick properties will no longer be effective, and the coating could potentially flake off during cleaning.
| Common Pot Cleaning Mistakes | Practical Solutions |
|---|---|
| Using too much elbow grease or abrasive scrubbers | Gentle scrubbing with a non-abrasive sponge or cloth is key to avoid scratching the surface. |
| Forgetting to pre-soak tough stains | Allow the baking soda and vinegar mixture to sit for 10-15 minutes before scrubbing for best results. |
| Neglecting the exterior of the pot | Don’t forget to clean both the interior and exterior surfaces for a complete restoration. |
| Using the wrong cleaning tools on non-stick pans | Stick to soft sponges or cloths to avoid damaging the delicate non-stick coating. |
By taking these simple precautions, you can ensure that your pot-cleaning project is a resounding success, leaving you with shiny, like-new cookware that will continue to serve you well for years to come.

Maintaining That Shine: Tips for Lasting Luster
Once you’ve restored your pots to their former glory, the key is to keep them that way. Regular cleaning with the baking soda and vinegar method can help prevent the buildup of grease and residue, making it easier to maintain that fresh-from-the-store shine.
Additionally, be mindful of how you use and store your cookware. Avoid stacking pots and pans, as this can lead to scratches and dents. When washing, use warm water and a mild dish soap, and be sure to dry them thoroughly to prevent water spots.
With a little bit of care and attention, you can keep your revived pots looking their best for years to come, saving money and reducing waste in the process.
When a Stained Pot is Still Safe to Use
It’s important to note that while discoloration and staining can make your pots look unsightly, it doesn’t necessarily mean they are unsafe to use. In many cases, a pot that’s lost its luster can still be perfectly functional, as long as the surface is free of cracks, chips, or other structural damage.
If you’ve tried the baking soda and vinegar method and the pot still has some stubborn stains or discoloration, don’t worry. As long as the pot is still in good condition and you can easily clean the interior, it’s likely safe to continue using it for your cooking needs.
However, if the pot is heavily damaged or the non-stick coating is severely compromised, it’s best to replace it to ensure your safety and the quality of your food. When in doubt, it’s always better to err on the side of caution.
What is the best way to clean a burnt pot?
The best way to clean a burnt pot is to start by boiling a mixture of water and baking soda in the pot. Let it simmer for 10-15 minutes, then use a non-abrasive sponge or scrub brush to gently remove the burnt-on residue. For tougher stains, you can try soaking the pot in a vinegar and water solution before scrubbing.
Can I use steel wool to clean my pots and pans?
No, it’s best to avoid using steel wool or other abrasive scrubbers on your pots and pans, as they can scratch the surface and damage the finish. Stick to non-abrasive sponges, cloths, or brushes to gently clean your cookware.
How often should I clean my pots and pans?
It’s a good idea to clean your pots and pans after each use to prevent the buildup of grease and residue. For a more thorough cleaning, use the baking soda and vinegar method every few months or as needed to keep your cookware looking its best.
Can I use baking soda and vinegar on non-stick pans?
Yes, you can use the baking soda and vinegar method on non-stick pans, but be sure to use a soft sponge or cloth and avoid any abrasive scrubbing to prevent damage to the delicate coating.
What’s the best way to store pots and pans to keep them looking shiny?
To keep your pots and pans looking their best, avoid stacking them on top of each other, which can lead to scratches and dents. Instead, store them separately or nest them with a piece of parchment paper or a silicone mat in between to protect the surfaces.
Can I use the baking soda and vinegar method on enameled cast iron?
Yes, the baking soda and vinegar method can be used on enameled cast iron cookware. Just be sure to use a gentle scrubbing motion to avoid damaging the enamel coating.
How can I prevent my pots and pans from getting so dirty in the first place?
To prevent excessive buildup of grease and residue, be sure to clean your pots and pans immediately after use. Avoid letting food or grease sit and harden, and consider using a baking soda and water paste as a regular maintenance cleaner to keep your cookware looking its best.
Can I use the baking soda and vinegar method on stainless steel pots and pans?
Yes, the baking soda and vinegar method works great for cleaning stainless steel cookware. Just be sure to avoid using any abrasive scrubbers, as they can scratch the surface of the steel.